Visual Studio Express 2012 for Web でいってみる 21.Ignite UIを使ってみた。
以前の記事、
Visual Studio Express 2012 for Web でいってみる 17.PartialViewとページング
http://sannomiyanotes.hatenablog.com/entry/20121225/1356428615
このページでPartialViewとページングにつてメモしたのですが、このとき
結構な量のコード作成が必要だしCSSとかビジュアルにも手がかかる、はなっから高機能なjQueryのプラグインを使った方がいいのでは?
という気になってきました。
そこで、『高機能なjQueryのプラグイン』ってやつをを探してみたところ
Ignite UIがいいかんじだったので試使用してみました。
以下はその試使用したときのメモ書きをまとめたものです。
Ignite UIでどんなことができるかとか、については以下のURLを参照ください。
http://jp.infragistics.com/Product.aspx?id=18974#Overview
さて、Ignite UIですが残念ながら有償です。初年度¥57,750(税込)で2年目以降は半額となるようです。おじさんのお小遣いからの出費としては高額ですが、いろんな機能がついて、UIも統一でき、きっとバグも出にくいだろう。Webのデザイン回りやJavaScriptなんかにはからきしな私には向いてる気がします。
※2015/07/16 追記:上記の価格についての情報は、このメモを最初に掲載した時点(2013年4月)での情報です。現在の価格は異なります。最新の価格については販売元にお問い合わせください。
今回は、Ignite UIのコンボとグリッドを使って、「17.PartialViewとページング」で作った商品一覧の表示にチャレンジします。
1.ASP.NET MVC4 プロジェクトの作成
Visual Studio Express 2012 for Web を立ち上げて、新しいプロジェクトを選択。
テンプレートの選択は、
[Visual C#]-[ASP.NET MVC4 Webアプリケーション]-
[インターネットアプリケーション]-ビューエンジン[Razor]と指定します。
念の為、デバッグ(F5)でホームページが表示されることを確認します。
2.Ignite UIのインストール
トライアル版をダウンロードしてインストールします。インストールの詳細は以下のページを参照ください。
http://jp.infragistics.com/Product.aspx?id=18974#Downloads
続いて、プロジェクトへIgnite UIをセットアップしていきます。
3.ファイルのコピー
Ignite UIがインストールされた状態で、スタートボタンー全てのプログラムで[Infragistics]フォルダを開きます。
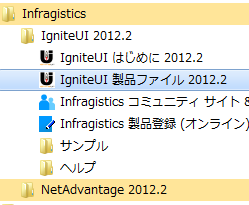
製品ファイルをクリックすると、[IgniteUI 2012.2]フォルダが開きます。
Visual Studio Express 2012 for Webで、1で作成したプロジェクトを開き、
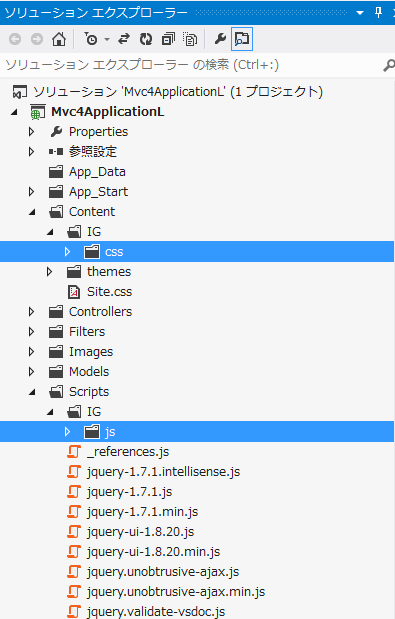
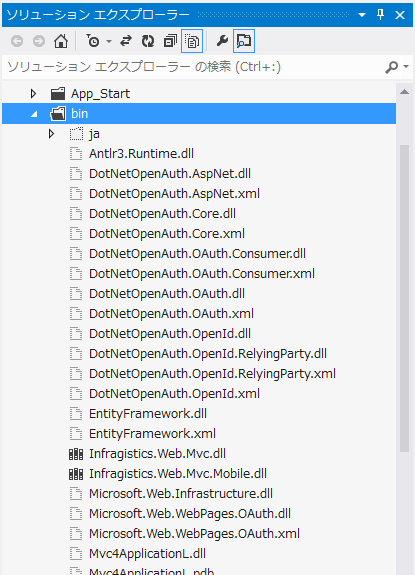
4.参照設定
ソリューションエクスプローラーの[参照設定]フォルダを右クリックし[参照の追加]をクリック、参照マネージャー画面より当該プロジェクトの[bin]をブラウズし
5.infragistics.loaderのbundleを追加
<!DOCTYPE html> <html lang="ja"> <head> <meta http-equiv="Content-Type" content="text/html; charset=utf-8"/> <meta charset="utf-8" /> <title>@ViewBag.Title ? マイ ASP.NET MVC アプリケーション</title> <link href="~/favicon.ico" rel="shortcut icon" type="image/x-icon" /> <meta name="viewport" content="width=device-width" /> @Styles.Render("~/Content/css") @Scripts.Render("~/bundles/modernizr") @* ADD *@ @Scripts.Render("~/bundles/jquery") @Scripts.Render("~/bundles/jqueryui") @*↓このタイミングでinfragistics.loaderをScripts.Renderするとエラーになる場合あり*@ @*@Scripts.Render("~/bundles/infragistics.loader")*@ </head> <body> <header> <div class="content-wrapper"> <div class="float-left"> <p class="site-title">@Html.ActionLink("ここにロゴを入れてください", "Index", "Home")</p> </div> <div class="float-right"> <section id="login"> @Html.Partial("_LoginPartial") </section> <nav> <ul id="menu"> <li>@Html.ActionLink("ホーム", "Index", "Home")</li> <li>@Html.ActionLink("バージョン情報", "About", "Home")</li> <li>@Html.ActionLink("連絡先", "Contact", "Home")</li> @*↓テスト用に追加*@ <li>@Html.ActionLink("商品指定と検索", "ShouhinSitei", "shouhin")</li> </ul> </nav> </div> </div> </header> <div id="body"> @RenderSection("featured", required: false) <section class="content-wrapper main-content clear-fix"> @RenderBody() </section> </div> <footer> <div class="content-wrapper"> <div class="float-left"> <p>© @DateTime.Now.Year ? マイ ASP.NET MVC アプリケーション</p> </div> </div> </footer> @*↓infragistics用の変更jqueryのLoadはheadで行うようにコメントアウト*@ @* @Scripts.Render("~/bundles/jquery")*@ @*↓この行はコメントアウトすると[登録]等が動かなくなる *@ @RenderSection("scripts", required: false) </body> </html>
using System;
using System.Collections.Generic;
using System.Linq;
using System.Web;

//以下のNameSpaceを追加
using System.ComponentModel;

namespace Mvc4ApplicationL.Models
{
    /// <summary>
    /// 商品コードの指定ページ用ビューモデル
    /// </summary>
    public class VM_ShouhinSitei
    {
        [DisplayName("商品コード")]
        public int shouhinCD { get; set; }
    }
    /// <summary>
    /// 商品区分の一覧用
    /// </summary>
    public class ShouhinKubun
    {
       public int    KubunCD  { get; set; }
       public string Kubunmei { get; set; }
    }
    public class ShouhinKubunModels
    {
        public static IQueryable<ShouhinKubun> GetShouhinKubunList()
        {
         List<ShouhinKubun> ItemList = new List<ShouhinKubun>();
         ItemList.Add(new ShouhinKubun { KubunCD = 0, Kubunmei = "すべての商品区分" });
         ItemList.Add(new ShouhinKubun { KubunCD = 1, Kubunmei = "飲料" });
         ... 省略 ...
         return ItemList.AsQueryable<ShouhinKubun>();
         }
    }
    /// <summary>
    /// 商品の一覧用
    /// </summary>
    public class Shouhin
    {
        public int    ShouhinCD    { get; set; }
        public string ShouhinName  { get; set; }
        public int    ShouhinKubun { get; set; }
    }
    public class ShouhinModels
    {
        public static IQueryable<Shouhin> GetShouhinList(Nullable<int> ShouhinKubun)
        {
         //商品データ
         List<Shouhin> shouhinList = new List<Shouhin>();
         shouhinList.Add(new Shouhin { ShouhinCD = 1, ShouhinName = "果汁100% オレンジ", ShouhinKubun = 1 });
         shouhinList.Add(new Shouhin { ShouhinCD = 2, ShouhinName = "果汁100% グレープ", ShouhinKubun = 1 });
            ... 省略 ...
         shouhinList.Add(new Shouhin { ShouhinCD = 124, ShouhinName = "綿菓子はつゆき", ShouhinKubun = 3 });

         //
         if (ShouhinKubun != null)
         {
             int shouhinYubunMIN = (int)ShouhinKubun;
             int shouhinYubunMAX = (int)ShouhinKubun;
             if (ShouhinKubun == 0) //全ての場合、MINとMAXをセット。
             {
                 shouhinYubunMIN = 1;
                 shouhinYubunMAX = 99;
             }
             IEnumerable<Shouhin> source =
                   from s in shouhinList
                   where s.ShouhinKubun >= shouhinYubunMIN && s.ShouhinKubun <= shouhinYubunMAX
                   orderby s.ShouhinCD
                   select s;
             return source.AsQueryable<Shouhin>();
            }
            else
            {
             List<Shouhin> shouhinListNull = new List<Shouhin>();
             return shouhinListNull.AsQueryable<Shouhin>();
            }
        }
    }
}
using System;
using System.Collections.Generic;
using System.Linq;
using System.Web;
using System.Web.Mvc;

using Infragistics.Web.Mvc;
using Mvc4ApplicationL.Models;
using System.Reflection;

namespace Mvc4ApplicationL.Controllers
{
    public class ShouhinController : Controller
    {
        //■■商品指定メインページ
        public ActionResult ShouhinSitei()
        {
            return View();
        }
        //■■商品検索ページ
        // 商品一覧をPartialViewで返します。
        [AjaxOnly]
        public ActionResult _pShouhinKensaku(string TergetElement)
        {
            ViewBag.KensakuTergetElement = TergetElement;
            return PartialView("_pShouhinKensaku");
        }
        // 商品区分の一覧をJSONで返します。
        public JsonResult ShouhinKubunList()
        {
            IQueryable<ShouhinKubun> data = ShouhinKubunModels.GetShouhinKubunList();
            return Json(data, JsonRequestBehavior.AllowGet);
        }
        // 商品一覧をViewで返します。
        [GridDataSourceAction]
        public ActionResult GetShouhinList(Nullable<int> cd)
        {
            return View(Models.ShouhinModels.GetShouhinList(cd));
        }
        //Jsonで商品データを渡します。
        public JsonResult GetJsonDataShouhin(Nullable<int> cd)
        {
            var model = ShouhinModels.GetShouhinList(cd);
            return Json(model, JsonRequestBehavior.AllowGet);
        }
        //Attribute[AjaxOnly]
        public class AjaxOnlyAttribute : ActionMethodSelectorAttribute
        {
            public override bool IsValidForRequest(
            ControllerContext controllerContext, MethodInfo methodInfo)
            {
                return controllerContext.HttpContext.Request.IsAjaxRequest();
            }
        }
    }
}
@model Mvc4ApplicationL.Models.VM_ShouhinSitei
@using (Html.BeginForm())
{
    @Html.ValidationSummary(true)

    <fieldset>
       <legend>VM_ShouhinSitei</legend>
        <div class="input-Line" style = "float:left;width:100%;height:40px;line-height:30px;">
            <span class="editor-label" >
                @Html.LabelFor(model => model.shouhinCD,new{ style="width:80px;float:left;mar;margin:4px;" }) </span>
            <span class="editor-field" >
                @Html.EditorFor(model => model.shouhinCD,null,"input-shouhinCD",null)
                @Html.ValidationMessageFor(model => model.shouhinCD)
            </span>

            @*Link1:初回の商品検索呼び出しはAjax.ActionLinkで*@
            <span class="KensakuLink" id="linkShouhinKensaku">
                 @Ajax.ActionLink(" ","_pShouhinKensaku","Shouhin",
                   new {TergetElement="input-shouhinCD"},@*選択結果を返す要素名をパラメータ渡し*@
                   new AjaxOptions() {
                        HttpMethod = "POST"
                      ,UpdateTargetId = "pvShouhinKensaku"},
                   new {
                       style = @"background: url('../../Content/themes/base/images/ui-icons_2e83ff_256x240.png')no-repeat center right; background-position: -160px -110px; -moz-transform: scale(2.0); -webkit-transform: scale(2.0); -o-transform: scale(2.0); -ms-transform: scale(2.0); margin:10px;padding-left: 5px; height:15px; width:10px; float:left; cursor:pointer;"
                       })
           </span>
            @*Link2:2回目以降に商品検索ビューはhide→showで表示*@
            <span class="KensakuLink" id="ShowShouhinKensaku"
                  style = "display: none; background: url('../../Content/themes/base/images/ui-icons_2e83ff_256x240.png')no-repeat center right; background-position: -160px -110px; -moz-transform: scale(2.0); -webkit-transform: scale(2.0); -o-transform: scale(2.0); -ms-transform: scale(2.0); margin:10px; padding-left: 5px; height:15px; width:10px; float:left; cursor:pointer;"
                     }></span>
        </div>
        <style>#input-shouhinCD {width:100px;height:20px;float:left;}</style>

    </fieldset>
}
 @*商品検索の部分ビュー挿入部分*@
 <div id="pvShouhinKensaku" style="width:415px;"></div>

<script type="text/javascript">
        //初回の商品検索ビューの呼び出し
        $("#linkShouhinKensaku").click(function () {
            $('#ShowShouhinKensaku').show();
            $('#linkShouhinKensaku').hide();
        })

        //2回目以降に商品検索ビューはhide→showで表示
        $("#ShowShouhinKensaku").click(function () {
            $('#linkShouhinKensaku').hide();
            $('#pvShouhinKensaku').show();
        })
</script>
@section Scripts {
    @Scripts.Render("~/bundles/jqueryval")
}
@using Mvc4ApplicationL.Models;
@using Infragistics.Web.Mvc;

@Scripts.Render("~/bundles/infragistics.loader")
@(Html.Infragistics().Loader()
                .ScriptPath(Url.Content("~/Scripts/IG/js/"))
                .CssPath(Url.Content("~/Content/IG/css/"))
                .Resources("igShared,igDialog")
                .Render())

<div style="border:solid;border-color: #CFCFCF";border-width: 0.1px;>

    @*↓グリッドを閉じるボタン *@
    <div class="CloseKensaku" id="closeKensaku"
         style  = "float:right; cursor:pointer; background: url('../../Content/themes/base/images/ui-icons_2e83ff_256x240.png')no-repeat center right; background-position: -100px -130px; -moz-transform: scale(2.0); -webkit-transform: scale(2.0); -o-transform: scale(2.0); -ms-transform: scale(2.0); height:15px; width:10px; margin:10px; padding-left: 4px;">
    </div>

    @* ↓商品区分のコンボ *@
    <div style="display: block; height: auto; width:auto;margin-left: 5px; margin-right: 5px;">
        @(Html.Infragistics().Combo()
            .ID("Combo1").Width("200px").Height("30px")
            @*商品区分の一覧をJSONで受け取る*@
            @*DataSourceUrlからはJSONで返す。gridのようにViewで返すのはダメみたい。*@
            .DataSourceUrl(Url.Action("ShouhinKubunList"))
            .ValueKey("KubunCD")
            .TextKey("Kubunmei")
            .NullText("商品区分を選択してください")
            .DataBind()
            .Render())
    </div>

    @* ↓商品のグリッド *@
    <div id="ShouhinList" style="width:650px; height: 460px;margin-left: 5px; margin-right: 5px;">
        @(Html.Infragistics().Grid<Shouhin>()
            .ID("grid1")
            .Width("400px")
            .Height("440px")
            .AutoGenerateColumns(false)
            .Columns(column =>
                {
                 column.For(x => x.ShouhinCD)
                                  .HeaderText("コード")
                                  .Width("100px")
                                  .DataType("number");

                  column.For(x => x.ShouhinName)
                                  .HeaderText("商品名")
                                  .Width("200px")
                                  .DataType("string");

                  column.For(x => x.ShouhinKubun)
                                  .HeaderText("区分")
                                  .Width("50px")
                                  .DataType("string");
                })
            .Features(features =>
                {
                 features.Paging().Type(OpType.Local)
                                  .VisiblePageCount(5)
                                  .ShowPageSizeDropDown(true)
                                  .PageSize(10)
                                  .PrevPageLabelText("前頁")
                                  .NextPageLabelText("次頁");
                 features.Filtering().Type(OpType.Local).Mode(FilterMode.Advanced);
                 features.Sorting().Type(OpType.Local).Mode(SortingMode.Single);
                 features.Selection().MouseDragSelect(true)
                                     .MultipleSelection(false)
                                     .Mode(SelectionMode.Row);
                 features.Resizing();
                })
            //DataSourceの指定方法は色々サポートされてます
            //.DataSourceUrl(Url.Action("GetJsonDataShouhin"))//JsonResult return Json
            .DataSourceUrl(Url.Action("GetShouhinList"))  //ActionResult return View
            .LocalSchemaTransform(true)
            .DataBind()
            .Render()
            )
    </div>

    @* ↓メッセージダイアログ *@
    <div>
        @(Html.Infragistics().Dialog()
            .ContentID("igDialog1")
            .ShowMinimizeButton(true)
            .ShowMaximizeButton(true)
            .ShowPinButton(true)
            .Width("400px")
            .Height("500px")
            .Render()
        )
    </div>
</div>
 @*↓ここに検索結果を返す要素IDをViewBagよりセット*@
<div id="KensakuTergetElement" style="display: none;">@ViewBag.KensakuTergetElement</div>

 @*↓ダイアログ要素*@
<div style="display: block; height: auto; width:auto;">
        <!--igDialog target element-->
        <div id="kcmnMsgDialog" style="vertical-align: bottom; display: none;" >
            <div id="kcmnMsgDialogprompt">ダイアログに表示するメッセージ要素</div>
            <button id="kcmnMsgDialogprompt_yes"    style="vertical-align: bottom; display: none;"></button>
            <button id="kcmnMsgDialogprompt_no"     style="vertical-align: bottom; display: none;"></button>
            <button id="kcmnMsgDialogprompt_cancel" style="vertical-align: bottom; display: none;"></button>
        </div>
</div>

<script type="text/javascript">
    //選択結果を格納する変数を用意
    var shouhincd = "";
    //検索結果を返す要素:ViewBag → #KensakuTergetElement → targetelementと渡される。
    var targetelement = "#" + $(KensakuTergetElement).text();

    //×closeのクリック時は部分ビュー部分を隠す。
    $("#closeKensaku").live("click", function (e) {
        $('#pvShouhinKensaku').hide();
    });

    //コンボの選択値が変更されたとき
    $('#Combo1').live('igcomboselectionchanged', function (event, args) {
        if (args.items != null) {
            //グリッドのデータを再セットする。商品区分をパラメータで渡す。
            $('#grid1').igGrid({
                dataSource: "/Shouhin/GetShouhinList?cd=" + args.items[0].value
            });
        }
    });
    //グリッドの一覧から1行選択されたとき
    $('#grid1').live('iggridselectionactiverowchanged', function (event, args) {
        //選択された行から商品コードと商品名を取得し
        shouhincd = args.row.element[0].cells[0].textContent
        var msg = "商品=" + args.row.element[0].cells[0].textContent + ":"
                          + args.row.element[0].cells[1].textContent
        //ダイアログのメッセージ領域にセット。
        msg = "指定内容を確認してください" + "<br/>" + "<hr>" + msg + "<br/>" + "<hr>"
        $("#kcmnMsgDialogprompt").html(msg)

        //ボタンの設定[OK]と[キャンセル]を表示します
       $("#kcmnMsgDialogprompt_yes").css({ display: "" });
       $("#kcmnMsgDialogprompt_yes").igButton({ labelText: "OK" });
       $("#kcmnMsgDialogprompt_cancel").css({ display: "" });
       $("#kcmnMsgDialogprompt_cancel").igButton({ labelText: "キャンセル" });

       //ダイアログを表示します。
       $.ig.loader(function () {
            // Initialize the igDialog
            $("#kcmnMsgDialog").igDialog({
                  state: "opened"
                , trackFocus: false
                , enableHeaderFocus: false
                , closeOnEscape: false
                , showMinimizeButton: false
                , showMaximizeButton: false
                , showPinButton: false
                , imageClass: "ui-icon ui-icon-info"
                , openAnimation: "fade"
                , closeAnimation: "fade"
                , headerText: "確認してください"
                , showFooter: false
            });
        });
    });
    //ダイアログ.yesをクリック時
    $("#kcmnMsgDialogprompt_yes").live("click",function (e) {
        //ダイアログを閉じる
        $("#kcmnMsgDialog").igDialog("close");
        // 検索ビューを隠す
        $('#pvShouhinKensaku').hide();
        //選択した商品コードをターゲットにセット
        $(targetelement).val(shouhincd);
    });
    //ダイアログ.NOをクリック時
    $("#kcmnMsgDialogprompt_no").live("click", function (e) {
        $("#kcmnMsgDialog").igDialog("close");
    });
    //ダイアログ.cancelをクリック時
    $("#kcmnMsgDialogprompt_cancel").live("click", function (e) {
        $("#kcmnMsgDialog").igDialog("close");
    });
</script>
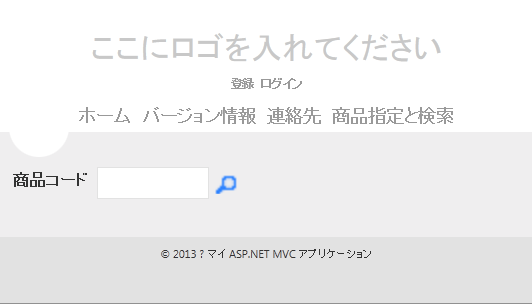
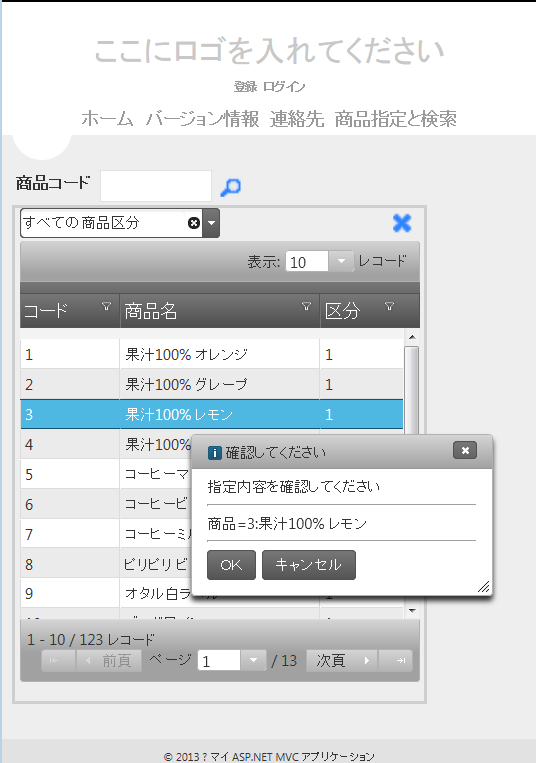
商品コード欄右の虫眼鏡イメージをクリックすると、商品検索部分ビューが表示されます。
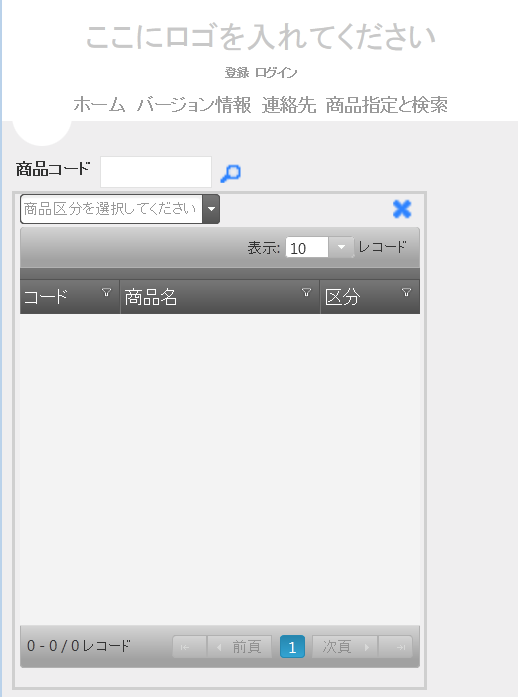
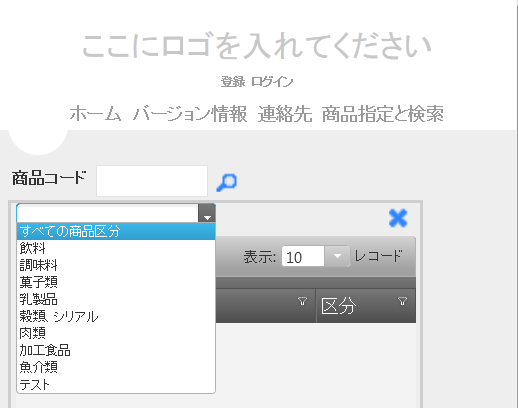
商品区分のコンボで商品区分を指定します。
指定の商品区分の商品の一覧がグリッドに表示されます。
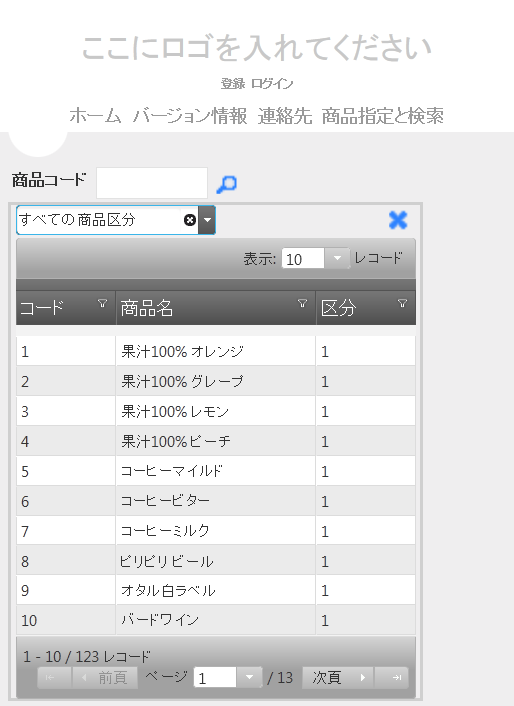
ページングが可能なことはもちろん、グリッドの見出し部分をクリックしてソートやフィルタがかけられます。
また列幅の変更も可能です。
以下はフィルタ指定ダイアログの例です。
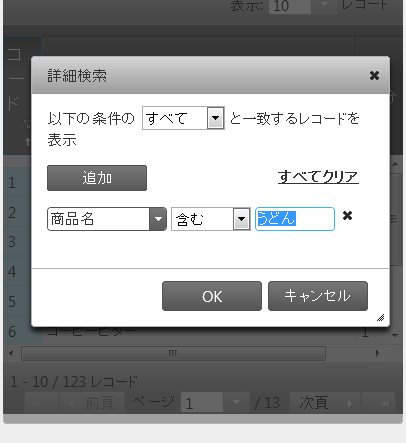
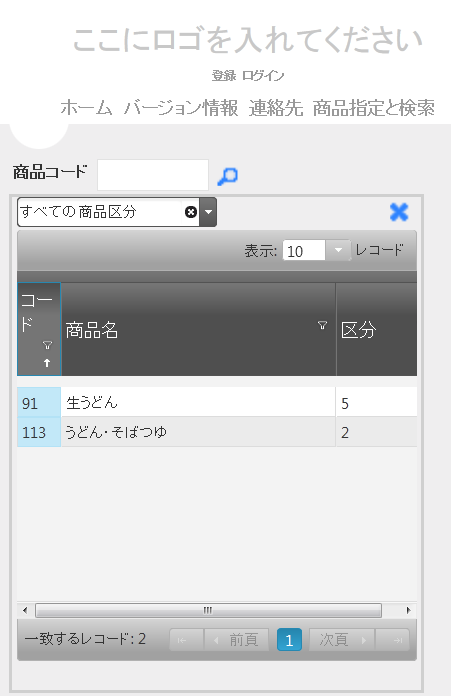
また、1ページあたりの表示レコードが変更できたり、多数の機能がありここでは紹介しきれません。
さて、グリッドで行クリックすると、以下の確認ダイアログが表示されます。
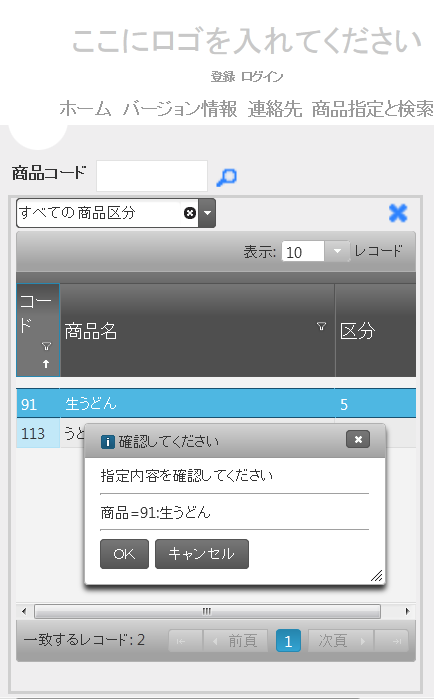
このダイアログもIgnite UIを利用して表示したものです。
OKをクリックすると
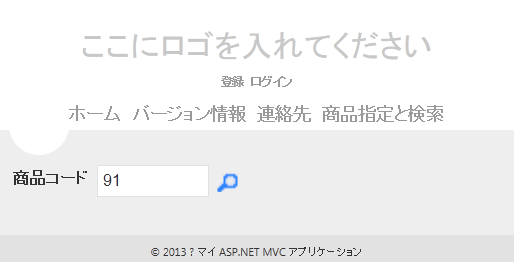
もとのページの商品コードフィールドに選択した商品のコードがセットされます。
尚、商品検索の部分ビューはhideしており、虫眼鏡をクリックすると、showされて再び表示されるようにしています。
以上、gnite UIの簡単な?紹介でした。今回は、商品検索部分を部分ビューを使って呼び出す形式を使いましたが、ダイアログで表示する方法のサンプルもありました。
会計や販売管理など企業で利用するWebシステム開発の場合、ビジュアルはそこそこでよくて、統一性が必要になるかと思いますし、ビジュアルよりもビジネスロジックの開発によりより力を割きたい私の場合など、こんなツールは非常に有益です。おじさんのお小遣いで購入するにはちょっと高額だなという気はしますが。
今回は以上です。